# 手写RPC框架:基于RPC框架封装一个spring-boot-starter

# 介绍
整合的逻辑非常简单,只写了2个注解,1个自动装配的类和2个扩展类
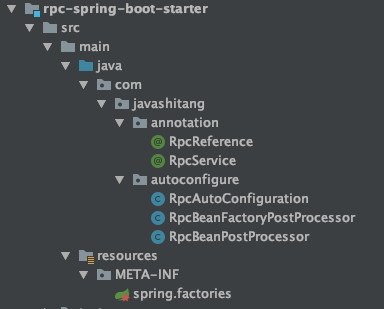
# 开发注解
服务引入注解,用在需要进行远程调用的接口上
@Retention(RetentionPolicy.RUNTIME)
@Target(ElementType.FIELD)
public @interface RpcReference {
}
服务导出注解,我这里取巧了一波,在这个注解上加了@Component注解,这样被这个注解标记的类就能被注入到spring容器中。
更优雅的实现方式是,自己扫描加了RpcService注解的类,然后注册到容器中。为了让大家理解主要思想,我就取巧了一波,直接在上面加了@Component注解
@Component
@Retention(RetentionPolicy.RUNTIME)
@Target(ElementType.TYPE)
public @interface RpcService {
}
# 开发自动装配和扩展逻辑
在之前的文章,《Spring Boot是如何实现自动装配的》,我们知道spring容器启动时会把spring.factories文件中对应的类注入到容器中。我们在spring.factories中写了如下配置。即在spring容器启动的时候会把RpcAutoConfiguration这个类注入到容器中
org.springframework.boot.autoconfigure.EnableAutoConfiguration=\
com.javashitang.autoconfigure.RpcAutoConfiguration
RpcAutoConfiguration是个配置类,加了包扫描,会把RpcBeanFactoryPostProcessor和RpcBeanPostProcessor注入到容器中
@Configuration
@ComponentScan("com.javashitang.autoconfigure")
public class RpcAutoConfiguration {
}
之前的文章我们说过,开发人员扩展Spring容器的方式有如下两种
- 实现BeanFactoryPostProcessor接口(对生产Bean的工厂进行扩展)
- 实现BeanPostProcessor接口(对Bean的生命周期进行扩展)
RpcBeanFactoryPostProcessor的作用如下:如果spring容器中有被RpcService标注的Bean,说明需要服务导出,我们就开启netty服务,否则,不启动。
@Slf4j
@Component
public class RpcBeanFactoryPostProcessor implements BeanFactoryPostProcessor {

    @Override
    public void postProcessBeanFactory(ConfigurableListableBeanFactory beanFactory) throws BeansException {

        for (String beanDefinitionName : beanFactory.getBeanDefinitionNames()) {
            BeanDefinition beanDefinition = beanFactory.getBeanDefinition(beanDefinitionName);
            if (beanDefinition instanceof AnnotatedBeanDefinition) {
                AnnotationMetadata metadata = ((AnnotatedBeanDefinition) beanDefinition).getMetadata();
                if (metadata.isAnnotated(RpcService.class.getName())) {
                    NettyServer nettyServer = new NettyServer();
                    new Thread(() -> {
                        nettyServer.start();
                    }).start();
                    break;
                }
            }
        }
    }
}
RpcBeanPostProcessor的作用如下:如果一个类被RpcService标注,则进行服务导出,将对应的服务注册到注册中心。如果一个类的成员变量被RpcReference标注,则获取接口的代理对象,进行服务引入,并将这个类的成员变量赋值为代理对象
public class RpcBeanPostProcessor implements BeanPostProcessor {

    @Override
    public Object postProcessAfterInitialization(Object bean, String beanName) throws BeansException {
        Class<?> targetClass = bean.getClass();
        RpcService rpcService = targetClass.getAnnotation(RpcService.class);
        if (rpcService != null) {
            ServiceMap.registryService(this.getServiceKey(bean), bean);
        }
        Field[] declaredFields = targetClass.getDeclaredFields();
        for (Field declaredField : declaredFields) {
            RpcReference rpcReference = declaredField.getAnnotation(RpcReference.class);
            if (rpcReference != null) {
                Object proxy = ConsumerProxy.getProxy(declaredField.getType());
                declaredField.setAccessible(true);
                try {
                    declaredField.set(bean, proxy);
                } catch (IllegalAccessException e) {
                    e.printStackTrace();
                }
            }
        }
        return bean;
    }

    public String getServiceKey(Object bean) {
        return bean.getClass().getInterfaces()[0].getCanonicalName();
    }

}
# 基于starter开发的客户端
pom文件中加上对应的starter
<dependency>
  <groupId>com.javashitang</groupId>
  <artifactId>rpc-spring-boot-starter</artifactId>
</dependency>
@SpringBootApplication
public class RpcServerApplication {

    public static void main(String[] args) {
        SpringApplication.run(RpcServerApplication.class, args);
    }
}
对接口进行实现,并用@RpcService注解进行服务导出
@RpcService
public class StudentServiceImpl implements StudentService {

    @Override
    public Student getStudentInfo(Integer id) {
        Student student = Student.builder().id(id).name("test").age(10).build();
        return student;
    }
}
因为在rpc框架中固定从rpc.properties文件中读取配置,没有针对spring配置这种方法进行兼容,所以还得在rpc.properties中配置一下注册中心地址(你可以尝试把这部分配置兼容到application.yaml中)
rpc.properties
registry.address=myhost:2181
# 基于starter开发的服务端
@SpringBootApplication
public class RpcClientApplication {

    public static void main(String[] args) {
        SpringApplication.run(RpcClientApplication.class, args);
    }

}
@RestController
public class StudentController {

    @RpcReference
    private StudentService studentService;

    @RequestMapping("getStudentInfo")
    private OperStatus<Student> getStudentInfo(@RequestParam Integer id) {
        Student studentInfo = studentService.getStudentInfo(id);
        return OperStatus.newSuccess(studentInfo);
    }
}
用@RpcReference注解进行服务导出
在rpc.properties中配置注册中心地址和netty启动端口
registry.address=myhost:2181
server.port=9000
curl http://localhost:8080/getStudentInfo
{
    "msg": "操作成功",
    "code": 0,
    "data": {
        "id": 100,
        "name": "test",
        "age": 10
    },
    "success": true
}
服务正常调用,大功告成,是不是和使用dubbo的starter一样方便
github地址: https://github.com/erlieStar/simple-rpc