# Dubbo源码解析:客户端服务调用过程

# 介绍
其实客户端服务调用过程和服务端执行请求处理的过程很类似,搞懂请求经过的Channelhandler,就明白了一大半。
如果你没有看过 Dubbo源码解析:服务提供方接收请求及返回结果 (opens new window)
建议先看一下,这样你就能理解清楚Dubbo和Netty中Channelhandler的不同。
Netty中的Channelhandler用的是责任链模式,而Dubbo中的Channelhandler用的是装饰者模式。
常用的Handler如下
| ChannelHandler | 作用 |
|---|---|
| NettyClientHandler | 处理Netty客户端事件,如连接,断开,读取,写入,发生异常 |
| NettyServerHandler | 处理Netty服务端事件,如连接,断开,读取,写入,发生异常 |
| MultiMessageHandler | 多消息报文批处理 |
| HeartbeatHandler | 心跳处理 |
| AllChannelHandler | 将Netty的所有请求放到业务线程池中去处理 |
| DecodeHandler | 对消息进行解码 |
| HeaderExchangeHandler | 封装处理 Request/Reponse,和 telnet请求 |
| ExchangeHandlerAdapter | 查找服务方法并调用 |
其中NettyClientHandler和NettyServerHandler实现的是Netty中的ChannelHandler接口,而其他的实现的Dubbo中的ChannelHandler接口。
# 开始远程调用
在前面服务引入的文章中我们提到,最终返回的代理对象是调用JavassistProxyFactory#getProxy方法得到的
// JavassistProxyFactory
public <T> T getProxy(Invoker<T> invoker, Class<?>[] interfaces) {
    return (T) Proxy.getProxy(interfaces).newInstance(new InvokerInvocationHandler(invoker));
}
所以代理对象执行的任何方法都会进入InvokerInvocationHandler#invoke
public Object invoke(Object proxy, Method method, Object[] args) throws Throwable {
    String methodName = method.getName();
    Class<?>[] parameterTypes = method.getParameterTypes();
    // 拦截定义在 Object 类中的方法(未被子类重写),比如 wait/notify
    if (method.getDeclaringClass() == Object.class) {
        return method.invoke(invoker, args);
    }
    // 如果 toString、hashCode 和 equals 等方法被子类重写了,这里也直接调用
    if ("toString".equals(methodName) && parameterTypes.length == 0) {
        return invoker.toString();
    }
    if ("hashCode".equals(methodName) && parameterTypes.length == 0) {
        return invoker.hashCode();
    }
    if ("equals".equals(methodName) && parameterTypes.length == 1) {
        return invoker.equals(args[0]);
    }
    // 将 method 和 args 封装到 RpcInvocation 中,并执行后续的调用
    return invoker.invoke(createInvocation(method, args)).recreate();
}
执行链路如下
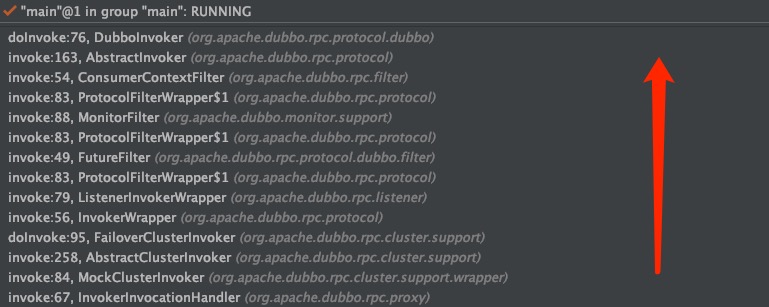 MockClusterInvoker:服务降级
FailoverClusterInvoker:集群容错
DubboInvoker:发起网络调用并获取结果
MockClusterInvoker:服务降级
FailoverClusterInvoker:集群容错
DubboInvoker:发起网络调用并获取结果
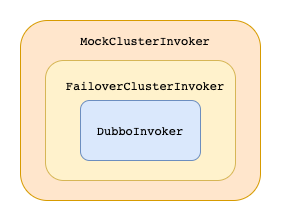 其实Dubbo中的集群容错和服务降级(mock)都是用装饰者实现的。最终发起网络调用的是DubboInvoker,当配置了不同的集群容错策略时,就用不同的装饰类来装饰,另外因为MockClusterInvoker是一个包装类,会装饰在最外面,用来实现服务降级
# MockClusterInvoker
MockClusterInvoker主要用来服务降级,即在请求之前返回特定的值,不发起实际的调用,或者调用失败后,不抛出异常,返回特定的值
mock=force:return+null 表示消费方对该服务的方法调用都直接返回 null 值,不发起远程调用。用来屏蔽不重要服务不可用时对调用方的影响。
还可以改为 mock=fail:return+null 表示消费方对该服务的方法调用在失败后,再返回 null 值,不抛异常。用来容忍不重要服务不稳定时对调用方的影响。
@RestController
public class EchoController {

    @Reference(mock = "force:return default")
    private EchoService echoService;

    @RequestMapping("echo")
    public String echo(@RequestParam("msg") String msg) {
        return echoService.hello(msg);
    }

}
访问如下链接,直接返回default
http://localhost:8080/echo?msg=10
# DubboInvoker
// DubboInvoker
protected Result doInvoke(final Invocation invocation) throws Throwable {
    // 设置附加属性
    RpcInvocation inv = (RpcInvocation) invocation;
    final String methodName = RpcUtils.getMethodName(invocation);
    // 设置路径,版本
    inv.setAttachment(Constants.PATH_KEY, getUrl().getPath());
    inv.setAttachment(Constants.VERSION_KEY, version);

    // 获取客户端,发起实际调用
    // 构造DubboInvoker的时候已经初始化好了
    ExchangeClient currentClient;
    if (clients.length == 1) {
        currentClient = clients[0];
    } else {
        currentClient = clients[index.getAndIncrement() % clients.length];
    }
    try {
        // 是否为异步
        boolean isAsync = RpcUtils.isAsync(getUrl(), invocation);
        // 是否为future方式异步
        boolean isAsyncFuture = RpcUtils.isReturnTypeFuture(inv);
        // isOneway 为 true,表示“单向”通信
        boolean isOneway = RpcUtils.isOneway(getUrl(), invocation);
        // 超时等待时间
        int timeout = getUrl().getMethodParameter(methodName, Constants.TIMEOUT_KEY, Constants.DEFAULT_TIMEOUT);
        // 不需要响应的请求
        if (isOneway) {
            boolean isSent = getUrl().getMethodParameter(methodName, Constants.SENT_KEY, false);
            // 发起网络调用
            currentClient.send(inv, isSent);
            RpcContext.getContext().setFuture(null);
            return new RpcResult();
        } else if (isAsync) {
            // 异步有返回值
            // 同步:框架调用ResponseFuture#get()
            // 异步:用户调用ResponseFuture#get()
            ResponseFuture future = currentClient.request(inv, timeout);
            // For compatibility
            // FutureAdapter 是将ResponseFuture与jdk中的Future进行适配
            // 当用户调用Future的get方法时,经过FutureAdapter的适配,最终会调用DefaultFuture的get方法
            FutureAdapter<Object> futureAdapter = new FutureAdapter<>(future);
            RpcContext.getContext().setFuture(futureAdapter);

            Result result;
            // 返回值是否是 CompletableFuture
            if (isAsyncFuture) {
                // register resultCallback, sometimes we need the async result being processed by the filter chain.
                result = new AsyncRpcResult(futureAdapter, futureAdapter.getResultFuture(), false);
            } else {
                result = new SimpleAsyncRpcResult(futureAdapter, futureAdapter.getResultFuture(), false);
            }
            return result;
        } else {
            // 同步有返回值
            RpcContext.getContext().setFuture(null);
            // 发送请求,得到一个 ResponseFuture 实例,并调用该实例的 get 方法进行等待
            // 本质上还是通过异步的代码来实现同步调用
            return (Result) currentClient.request(inv, timeout).get();
        }
    } catch (TimeoutException e) {
        throw new RpcException(RpcException.TIMEOUT_EXCEPTION, "Invoke remote method timeout. method: " + invocation.getMethodName() + ", provider: " + getUrl() + ", cause: " + e.getMessage(), e);
    } catch (RemotingException e) {
        throw new RpcException(RpcException.NETWORK_EXCEPTION, "Failed to invoke remote method: " + invocation.getMethodName() + ", provider: " + getUrl() + ", cause: " + e.getMessage(), e);
    }
}
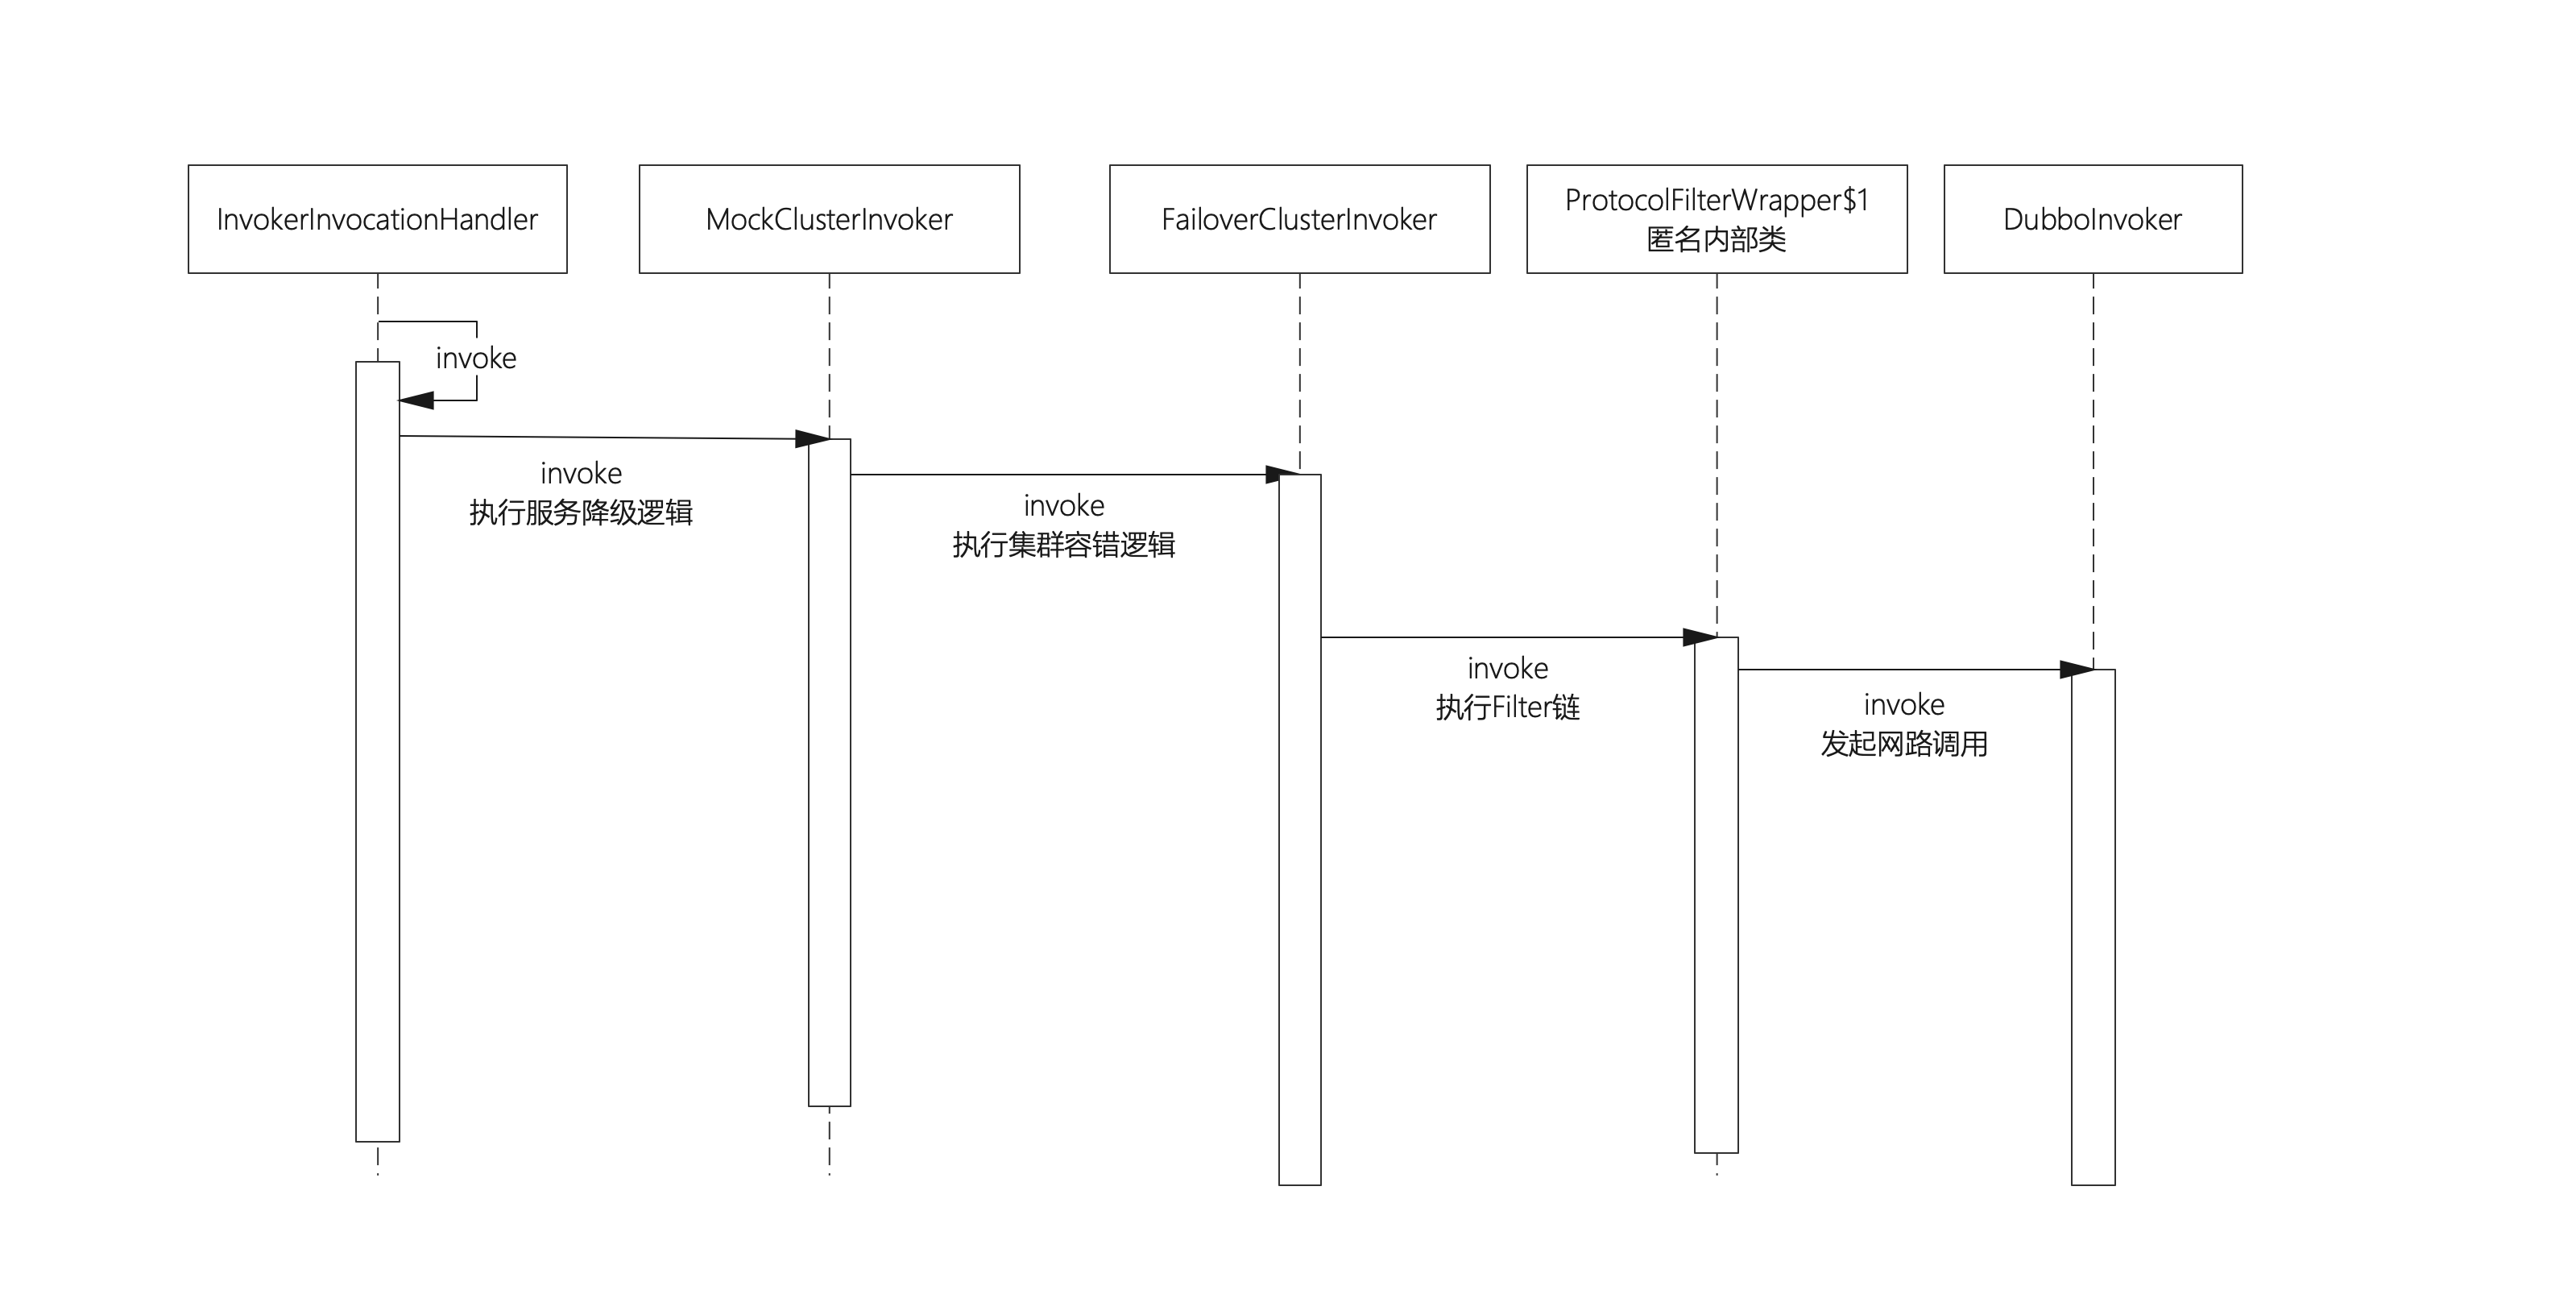
DubboInvoker#doInvoke这个方法是真正发起调用的方法 调用时分为2种情况
- 不需要返回值
- 需要返回值 2.1 同步请求,框架调用DefaultFuture的get方法 2.2 异步请求,用户调用DefaultFuture的get方法
画个流程图总结一下
# 发送网络请求
其实客户端发送请求,接收响应的过程和服务端的类似。都是在构造函数中初始化handler,并调用doOpen方法开启连接。
按照老套路来分析,看一下NettyClient发送和接收请求会经过哪些handler。
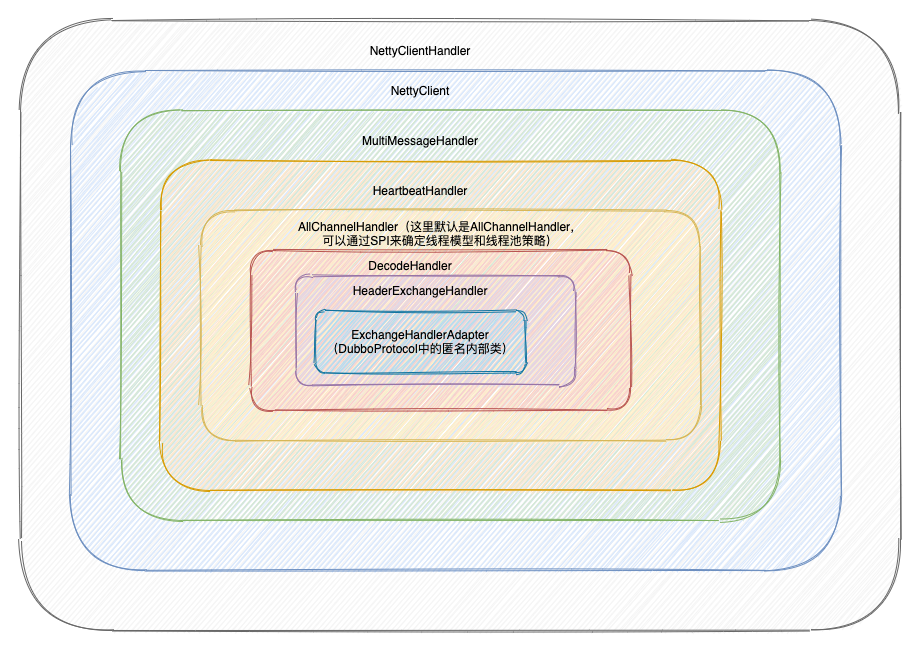 可以看到除了NettyClientHandler和NettyClient,其余的Handler和服务端的都一样
//
protected void doOpen() throws Throwable {
    // 执行业务逻辑的handler
    final NettyClientHandler nettyClientHandler = new NettyClientHandler(getUrl(), this);
    bootstrap = new Bootstrap();
    bootstrap.group(nioEventLoopGroup)
            .option(ChannelOption.SO_KEEPALIVE, true)
            .option(ChannelOption.TCP_NODELAY, true)
            .option(ChannelOption.ALLOCATOR, PooledByteBufAllocator.DEFAULT)
            //.option(ChannelOption.CONNECT_TIMEOUT_MILLIS, getTimeout())
            .channel(NioSocketChannel.class);

    if (getConnectTimeout() < 3000) {
        bootstrap.option(ChannelOption.CONNECT_TIMEOUT_MILLIS, 3000);
    } else {
        bootstrap.option(ChannelOption.CONNECT_TIMEOUT_MILLIS, getConnectTimeout());
    }

    bootstrap.handler(new ChannelInitializer() {

        @Override
        protected void initChannel(Channel ch) throws Exception {
            int heartbeatInterval = UrlUtils.getHeartbeat(getUrl());
            NettyCodecAdapter adapter = new NettyCodecAdapter(getCodec(), getUrl(), NettyClient.this);
            ch.pipeline()//.addLast("logging",new LoggingHandler(LogLevel.INFO))//for debug
                    .addLast("decoder", adapter.getDecoder())
                    .addLast("encoder", adapter.getEncoder())
                    .addLast("client-idle-handler", new IdleStateHandler(heartbeatInterval, 0, 0, MILLISECONDS))
                    .addLast("handler", nettyClientHandler);
        }
    });
}
不画图了,和服务端的差不多,我就用文字总结一下发起请求的流程图
- NettyClientHandler#write
- NettyClient(AbstractPeer#sent)
- MultiMessageHandler(AbstractChannelHandlerDelegate#sent)
- HeartbeatHandler#sent
- AllChannelHandler(WrappedChannelHandler#sent)(这里默认是AllChannelHandler,可以通过SPI来确定线程模型和线程池策略)
- DecodeHandler(AbstractChannelHandlerDelegate#sent)
- HeaderExchangeHandler#sent
# 接收响应
客户端收到消息经过的handler
- NettyClientHandler#channelRead
- NettyClient(AbstractPeer#received)
- MultiMessageHandler#received
- HeartbeatHandler#received
- AllChannelHandle#received(这里默认是AllChannelHandler)
- DecodeHandler#received
- HeaderExchangeHandler#received